 gbImageLab
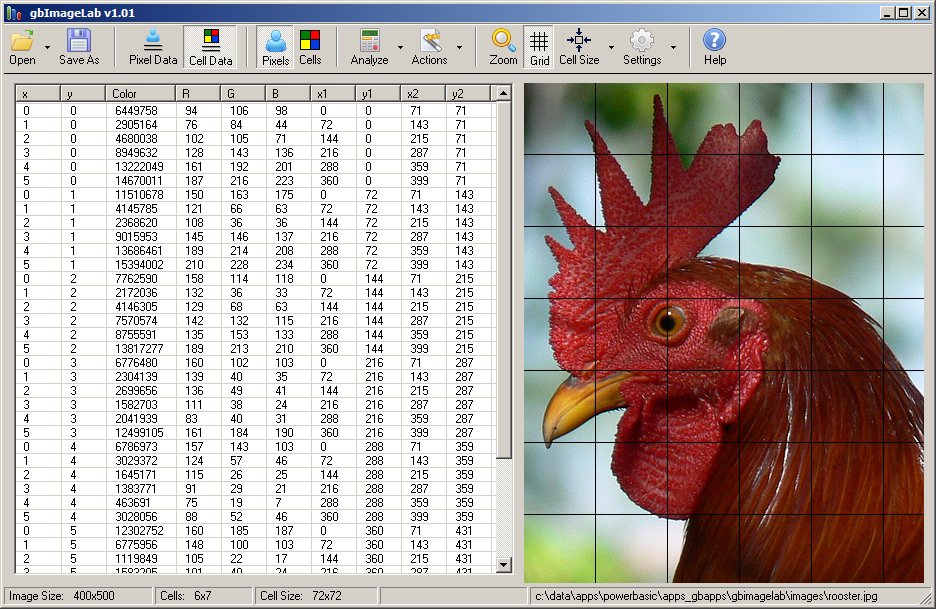
![]() gbImageLab is a freeware utility for providing cellular analysis of images. It allows
the user to load an image and then divide the image into a grid of cells. Various analyses and
image effects can be applied at either the image or cell level.
gbImageLab is a freeware utility for providing cellular analysis of images. It allows
the user to load an image and then divide the image into a grid of cells. Various analyses and
image effects can be applied at either the image or cell level.
PowerBASIC source code is provided. This allows a programmer to easily add their own effects/analysis. The built-in image/cellular framework makes it easy for a programmer to apply those effects at the image level, or on a cell-by-cell basis.
To install, simply unzip the installation file (gbimagelab.zip) in a folder of your choice. In addition to the EXE, the installation includes the gbImageLab source code, resource file, and image files.
|
|
| Features gbImageLab provides a wide range of features, with emphasis on making it easier to find and manipulate image color information.
|
Overview
gbImageLab allows the user to select and display an image (bmp/jpg/gif/png). A ListView control is used to display the coordinates, color, and R/G/B components of each pixel.
The image may also be displayed as cells, using pre-set or user-defined cell dimensions. An optional grid shows the cell locations. In cell mode, the color displayed is that of the average pixel color in each cell.
The ListView control may be used to show the cell data, cell coordinates, color, R/G/B color components, and cell boundary coordinates.
The image type (cell/pixel) and ListView data content (cell/pixel) can be independently selected.
Data Navigation
gbImageLab allows two ways to move between the displayed numerical data and the image. You can
click on the image to highlight the corresponding ListView line of cell/pixel data, or double-click
on the ListView control to highlight the corresponding image pixel/cell.
Double-clicking on a line in the ListView control will highlight that data in the image. If the image is showing pixels, then a circle will be drawn around the pixel. If the image is showing cells, then the cell will be highlighted with a red border. Multiple pixels/cells may be highlighted at one time.
Clicking on the image will autoscroll the ListView control to the corresponding pixel/cell data, according to the type of data currently displayed in the ListView control. Only a single ListView line of data may be highlighted at one time.
To remove all image highlighting, just switch away from the current image display mode (cell/pixel) and back again. Or, you can use the dropdown menu adjacent to the "Actions" toolbar button to select the "Clear Highlighting" option.
Toolbar
gbImageLab's features are accessed via the toolbar. No main/context menu are used.

Here are the toolbar options:

| Open Image | Browse for a bmp/jpg/gif/png file to open. The dropdown menu next to Open displays the MRU list. |

| Save As | Save the current image under a new name. Only the BMP file format is supported. |
| Pixel Data | Displays pixel data in the ListView control. | |

| Cell Data | Display cell data in the ListView control. |

| Pixels | Display the image as pixels. |

| Cells | Displays the images as cells, where each cell is filled with the average color of pixels in that cell. |

| Analyze | Dropdown menu provides various analyses of the current image, which currently includes:
- Histogram - Region of Interest - Custom Analysis (placeholder) |

| Actions | Dropdown menu displays available effects, which currently includes:
- Convert to Gray Scale - Flip Vertically - Flip Horizontally - Copy - Restore - Clear Highlighting - Clear Console - Load Clipboard Image |

| Zoom | Display popup zoom window showing 24x24 pixels nearst cursor location |

| Grid | Display a grid of lines showing cell boundaries. |

| Cell Size | When pressed, cycles through the pre-defined or user-defined cell sizes. Use the adjacent dropdown menu to select a specific cell size or to enter a user-defined cell size. |

| Settings | Dropdown menu displays session setting options, which currently includes:
- ColorFinder - ThinGrid - AutoScroll - Console |

| Help | Opens the gbImageLab online help page in the user's default browser. |
Zoom Window
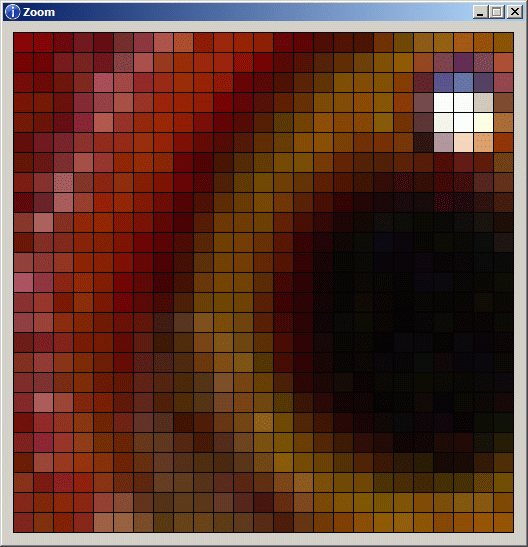 gbImageLab provides a built-in zoom window, which displays an enlarged view of the
24x24 pixels surrounding the cursor location. Use the Zoom button on the toolbar
to display/remove the Zoom window. You can also use the standard window exit features
(System Menu or "x" button).
gbImageLab provides a built-in zoom window, which displays an enlarged view of the
24x24 pixels surrounding the cursor location. Use the Zoom button on the toolbar
to display/remove the Zoom window. You can also use the standard window exit features
(System Menu or "x" button).
To select the area to be displayed in the zoom window, press the mouse button down while on the image and move the mouse. Once movement is detected, gbImageLab will display the image area underneath the mouse.
Simply pressing the mouse button over the image will not change the Zoom display. The mouse-down action is reserved for autoscrolling in ListView to the pixel/cell where the mouse button was pressed.
Console
 For a programmer's benefit, all of the functions (except Callback functions) include the following line of
code to write the function name to a console, if the console is displayed. This will allow
the programmer to track the code flow - particularly useful when adding/debugging new features.
For a programmer's benefit, all of the functions (except Callback functions) include the following line of
code to write the function name to a console, if the console is displayed. This will allow
the programmer to track the code flow - particularly useful when adding/debugging new features.
If Debug Then cPrint LCase$(FuncName$)If you add procedures to the source code, be sure to add the line of code to enable console tracking of the procedure.
Histogram
 One of the built-in image analysis tools is the histogram.
Mouse Actions
The mouse buttons, left and right, can be used to achieve a variety of effects.
Image Selection and Copy
The right mouse button can be dragged over the image to select a portion of the image. When
the mouse is released, the selection will remain identified by a rectangle and the selection will
also be automatically copied to the clipboard.
Pressing the left or right mouse will erase any previous selection.
With the colorfinder option selected, double-clicking on a line in ListView will highlight the pixel or cell corresponding to that line - pixel if the image is being shown or cell is the cells are on display. Highlighting is cumulative - each double-click highlights another pixel/cell. The Action >> Clear Highlighting menu can be used to clear all highlighting.
With the autoscroll option selected, pressing the left-mouse on the image will scroll the ListView control to the corresponding pixel/cell. If the mouse is then dragged, no further scrolling occurs (although the statusbar will display the cursor position and pixel/cell color) until the mouse is released, at which point the ListView will scroll again to match the pixel/cell under the cursor.
Other Comments
gbImageLab saves all of it's options in an INI file, which is placed in the same folder
as the EXE.
Programmer Comments
This section provides a brief overview of gbImageLab's source code, to help interested programmers
determine how the code works and how to modify it to add new features, or to enhance existing ones.
At the heart of gbImageLab are two arrays, PixelData() and CellData(), which are assigned the corresponding user data types.
     Type CellDataType
         x1 As Long
         y1 As Long
         x2 As Long
         y2 As Long
         Ravg As Long
         Gavg As Long
         Bavg As Long
         Aavg As Long
         Color As Long
     End Type

     Type PixelDataType
         Color As Long
         R As Byte
         G As Byte
         B As Byte
         A As Byte
     End Type
CFN - Current File Name
At any time, gbImageLab is displaying an image from a file (global variable CFN - current
file name) which is loaded via the procedure LoadCFN. LoadCFN us GDI+ API to allowing
loading of most image file types, but specifically including BMP, JPG, GIF, and PNG. The
loaded image is maintained in a memory bitmap (global handle hBMP). hBMP acts as the "original"
copy of the image. It is read, but never modified.
hBMP is used to load the PixelData() and CreateData() arrays through the CreatePixelData() and CreateCellData() procedures.
Alpha Data
Although gbImageLab can read in files with alpha channel data, the alpha channel data is not
used by gbImageLab because PowerBASIC does not support the alpha channel. The "A" column in
the ListView control is to all zeros. I've left that column in for future possible changes
to the way gbImageLab works.
Graphic Control
The main image display is in a Graphic Control, %IDC_Graphic. While PBWin10 allows the
Graphic Control to be resized, gbImageLab does not resize the Graphic Control because that would
change the color content of the displayed image and could distort the results of any analysis that is
preformed on the visible image (although, it would not affect any analysis performed on hBMP).
The Grapic Control is subclasseed to allow access to mouse actions.
Analyses/Actions
There are several actions/analyses that gbImageLab performs - histogram, convert to grayscale,
and flip image vertically/horizontally. While these are fully functional, they are included just
to show how to put features into gbImageLab - via selections in the toolbar and procedures which
implement the features.
Comments and suggestions are welcome!