
![]() This page provides the latest online Help information for gbLayout.
gbLayout provides an extremely easy-to-use method of optimizing the placement
of items into a defined area. 2D and 3D visualization of the results are
supported.
This page provides the latest online Help information for gbLayout.
gbLayout provides an extremely easy-to-use method of optimizing the placement
of items into a defined area. 2D and 3D visualization of the results are
supported.
|
|
|
|
|
|
|
|
|
|
|
|
A special Multi-Chip Module (MCM) Edition of gbLayout is also available. The MCM-specific features of gbLayout are covered here.
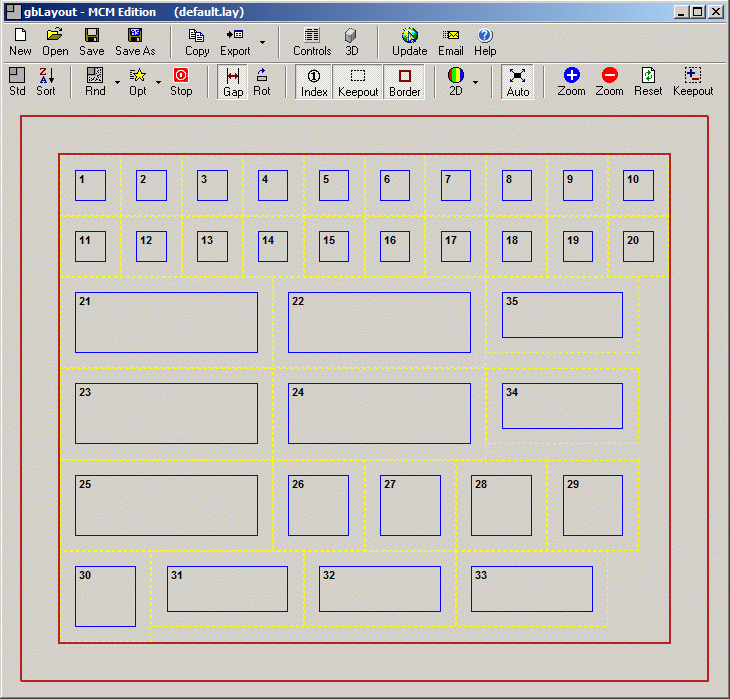
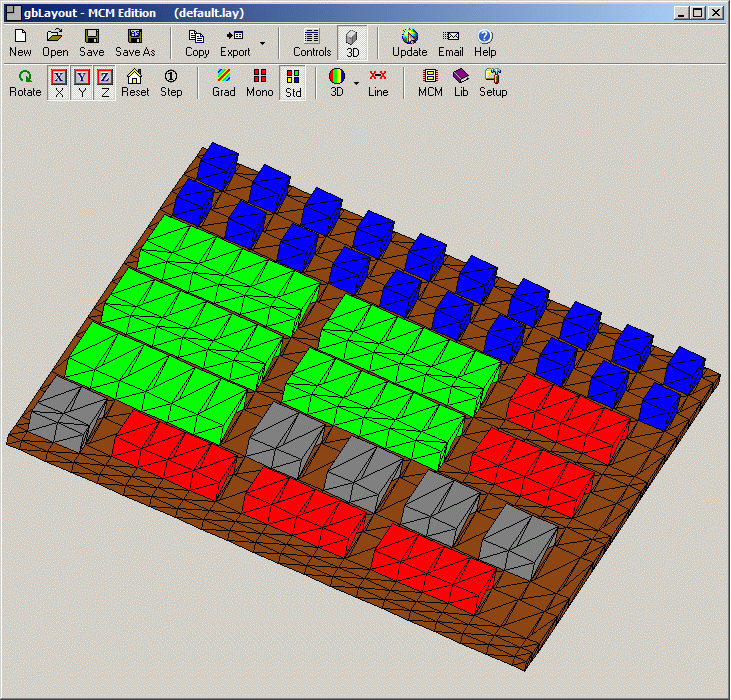
On the left of the screen is where user inputs are made, where the parts library is listed, and where the text summary of the placement results are shown. These controls can be removed to provide more space to display the layout images.
On the right of the screen is where the layout images are shown.
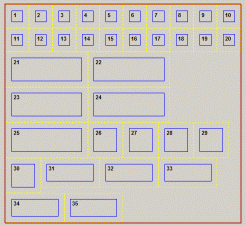
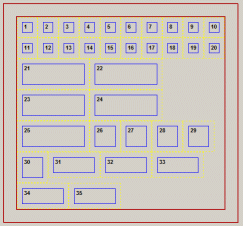
Here are images of gbLayout in its 2D and 3D modes of operation. The part list is created and placement completed in 2D mode (left image). The 3D image is viewed in 3D mode (right image).
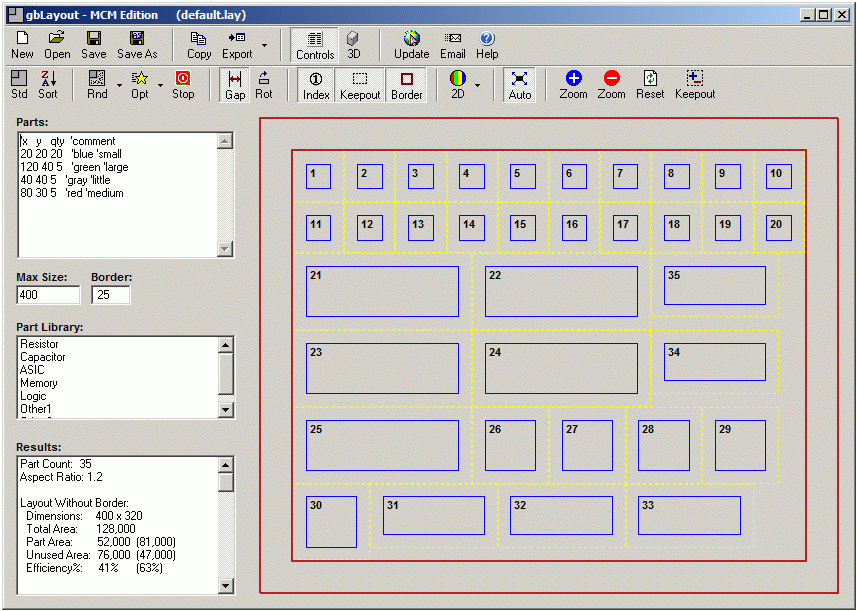
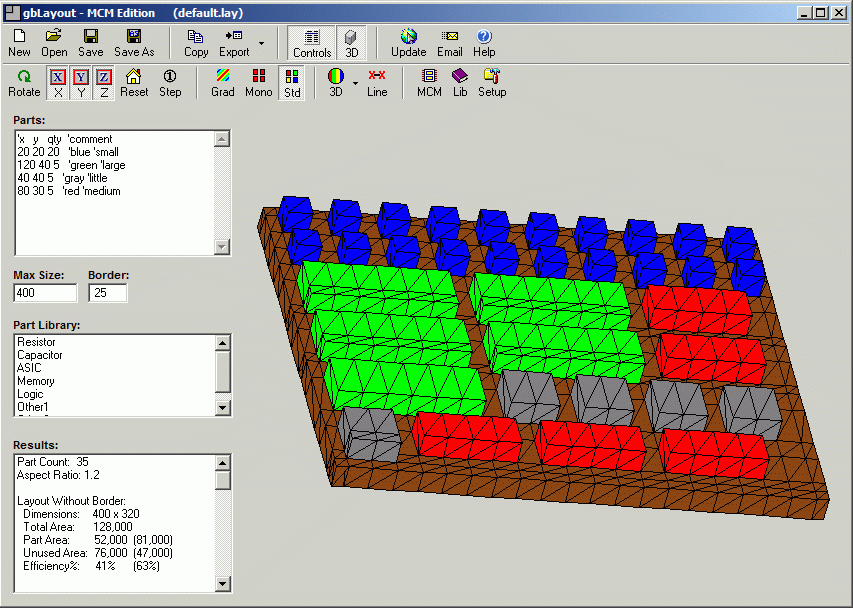
Note that the lower toolbar contains buttons specific to the current mode.
The various controls on the left side of the screen can be hidden to provide more room to display the 2D and 3D images, as these screen shots show:
Here is the top toolbar and a description of each button. This toolbar is displayed at all times.

| Create a new design file
| Open an existing design file
| Save current design to currently opened file
| Save current design to user-specified file
| Copy 2D/3D image to clipboard
| Save design to specified file format (STL, DXF)
| Display information controls (parts list, library, results)
| Display 3D toolbar
| Check for online update
| Send email to gbLayout author
| Open browser to gbLayout Online Help page
| |
Here is the bottom toolbar and a description of each button. This is the default content of the lower toolbar, corresponding to 2D mode of operation.

| Perform placement with parts ordered as specified in parts list
| Sort items by size, then perform placement
| Randomly sort items, then perform placement
| Randomly sort itmes, but perform placement over a all h/w combinations
| Stop placement iterations
| Fill layout gaps
| Allow part rotation when filling gaps
| Display part index
| Display keepouts
| Display border
| Select colors (border,parts,keepout,text,background)
| Sort items by size, then perform placement
| Randomly sort items, then perform placement
| Randomly sort itmes, but perform placement over a all h/w combinations
| Stop placement iterations
| Modify keepout for all parts
| |
Here is the bottom toolbar and a description of each button. This is the 3D content of the lower toolbar, corresponding to 3D mode of operation. This toolbar is shown when the "3D" button on the top toolbar is pressed.

| Automatically rotate image
| Allow rotation about X axis
| Allow rotation about Y axis
| Allow rotation about Z axis
| Return to starting position
| Single rotation
| Display in blue-to-red colors according to z position
| Display in single color
| Display using part library colors
| Select colors (lines, triangles, floor, background)
| Display/remove lines
| |
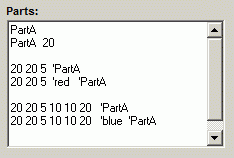
You can also manually type in the name of the library part.
To make it easier to enter multiple parts, you can follow the name of the parts with a quantity
(see line 2 in the image to the left).
Non-Library Parts
To add a part not found in the parts library, simply type in the xy size of the part, followed by
its quantity and description. The description must be preceded by a apostrophe (see line 3 in the
example to the left).
For purposes of generating a 3D image, an optional part color may also be specified. Place the color name before the part name, preceded by an apostrophe (see line 4 in the example to the left).
A more complete description of a non-library part can also be entered by entering the following part properties on a single line - x, y, qty, xkeepout, ykeepout, z, description (see line 5 in the example to the left).
See the Parts Library discussion below for a listing and description of all supported part properties.
As before, an optional color name may also be specified with a part (see line 6 in the example to the left).
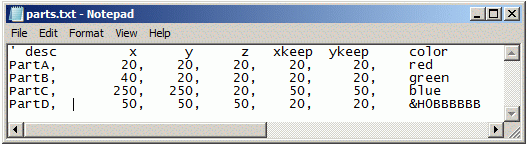
Here's a description of the properties for each part in the library.
| text description, used for finding a part within the part library (20 character limit)
| left-right width of the part
| top-bottom dimension of the part
| thickness of the part (extending out of the screen)
| area unavailable for parts placement on both left and right sides of the part
| area unavailable for parts placement at the top and bottom of the part
| Color used to display the part (color name or hexadecimal format)
| |
To edit the parts library, click on the "Parts Library" label to open the file in Notepad. Make any changes/additions required and then save the file.
Lines which begin with an apostrophe are ignored.
You must restart gbLayout for the changes to be reflected in the Parts Library list of gbLayout.
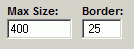
To fix the width of the layout area, enter a Max Size like this, where a single dimension is entered:
400
To fix both the width and height of the layout area, enter a Max Size like this, where both the width and height are given, separated by an "x".
400x400
If both the width and height are fixed, the layout area will be drawn to match the fixed dimensions - even if the parts will not fit into the specified dimensions. The parts will be shown, even if they lap over the layout border
The border size is specified by entering a single value into the "Border" textbox. The value entered is used on all four sides of the layout:
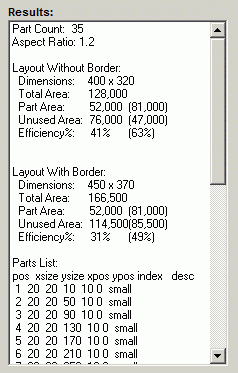
The list of parts is shown in the order in which they appear in the layout, along with the index number that is (optionally) displayed in the layout.
The borders are drawn around the layout, enclosing the area needed to place the parts.
The width of the border may be specified, plus it may be filled or unfilled, as specified by the user.
Within the layout drawing, display of the part index and keepout zones is optional.
Once the order of parts has been specified (more on that below), the first part in the parts list is placed in the top/left of the layout area. Parts are then placed left-to-right, until the maximum specified width (x-dimension) is reached/exceeded. Then placement continues starting at the left edge below the lowest point (including keepout) of the previous line of parts.
Placement continues left-to-right, moving downward (y-dimension) until all parts are placed.
When the next part to be placed will not fit on the current row (too wide, thus leaving a gap), the user has the option to direct gbLayout to attempt to fill the gap with the next available part whose width does not exceed the gap, provided that the part does not extend below the lowest point of the current line of parts.
Additionally, the user has the option to rotate parts (90 degrees clockwise) in order to fill the gap. A rotated part will be used to fill the gap if it does not extend below the lowest point of the current line of parts.
Both the gap filling and part rotation capabilities are optional and may be set using the appropriate toolbar buttons.
There are five toolbar buttons available for selecting the available placement options.
| Place the parts in the order in which they are entered into the Parts textbox.
| Sort the parts by width before performing placement
| Randomly order the parts before performing placement
| Randomly order the parts + vary the layout area dimensions
| Stop any placement iteration in progress
| |
In the case of #3 and #4, the random ordering of parts may also include random rotation of the parts.
Part Placement Iterations
In additional to performing a single placement of parts, gbLayout allows the user to perform
up to one thousand placements - then display the placement that resulted in the least required
layout area. Two different placement iteration approaches are provided:
Setting Iteration Options
The number of placement iterations performed and the maximum aspect ratio of the resulting
layout can be specified by the user.
The down arrow next to the Rnd toolbar button is used to select the number of iterations.
The down arrow next to the Opt toolbar button is used to select the maximum aspect ratio the user want to evaluate.
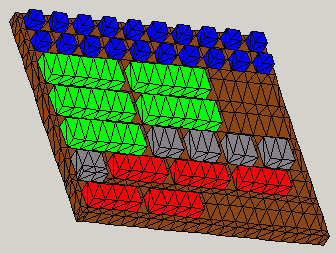
Here's an example of a 3D image of a layout.
And here is the 3D toolbar that is added (repeat of information provided above):
| Automatically rotate image
| Allow rotation about X axis
| Allow rotation about Y axis
| Allow rotation about Z axis
| Return to starting position
| Single rotation
| Display in blue-to-red colors according to z position
| Display in single color
| Display using part library colors
| Select colors (lines, triangles, floor, background)
| Display/remove lines
| |